March 28th - Tips on making a Purse or box
+3
Aimitup
Admin
Capadia
7 posters
Page 1 of 1
 March 28th - Tips on making a Purse or box
Hi everyone, it's Diane (aka Capadia) and I am honored to be here as the guest designer today. I had several ideas for projects and then this weekend I stumbled across some lovely faux leather paper in pearlized colors from American Crafts paper (in Marshall's of all places!). I wanted to give it a try and it was perfect for making a paper purse to use as a table favor or gift holder.
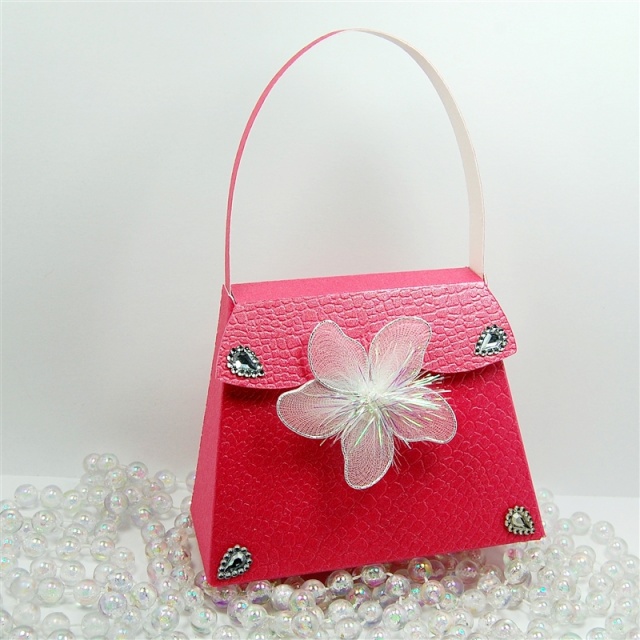
I have been trying to use some of the cartridges that I purchased in the Black Friday sales last year, you know - the ones I "had to have" that have been sitting idly on the shelf. One of these was "Forever Young" which is an older cartridge I didn't get at first because it seemed too girly for my needs (I have only sons).
I thought today I'd share a few tips I have for cutting and putting together bags and boxes from your Cricut cartridges.

One of my pet peeves with the cartridges is the "tick marks" they cut to indicate the folds. For a regular card they are nonsensical - we all know how to fold a piece of paper in half! - and on the boxes and purses they make a very untidy edge that is not attractive. You can see the edges in the sample purse I cut from scrap paper above.
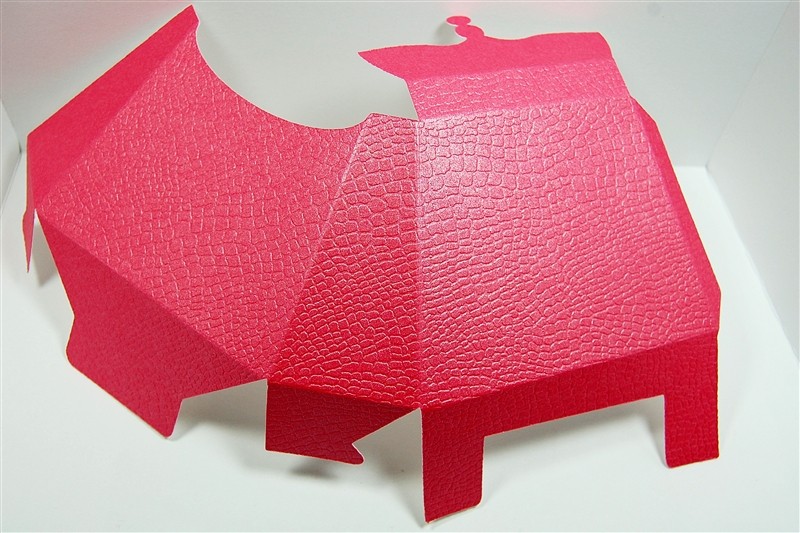
I don't like my pretty papers to be messed up with all of these extra lines. So I use Design Studio or the Gypsy to eliminate all of the interior cuts (known as webbing) with one simple step - just check weld. In the case of the purses on Forever Young you will also need to use "hide contour" to eliminate the word cut into the front. I can then use my sample cut with the marks to help me see where to score the purse to fold correctly. These score lines will be clean and neat with no cuts.
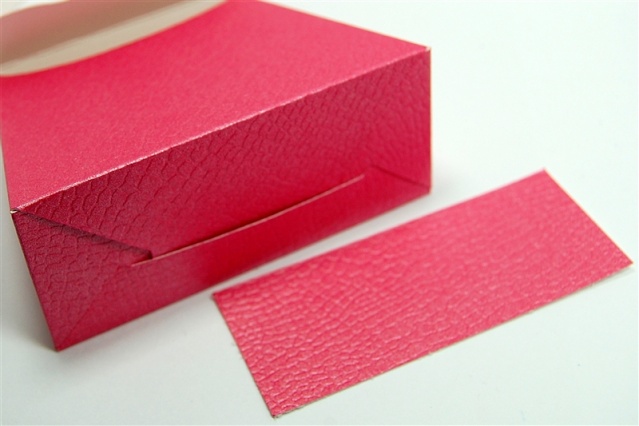
I was concerned that the bottom of the purse might not be sturdy enough for some heavy candy to be added so I cut an extra piece of cardstock to add as a reinforcement on the base. I use Scor-Tape or strong ATG adhesive to assemble bags and boxes.
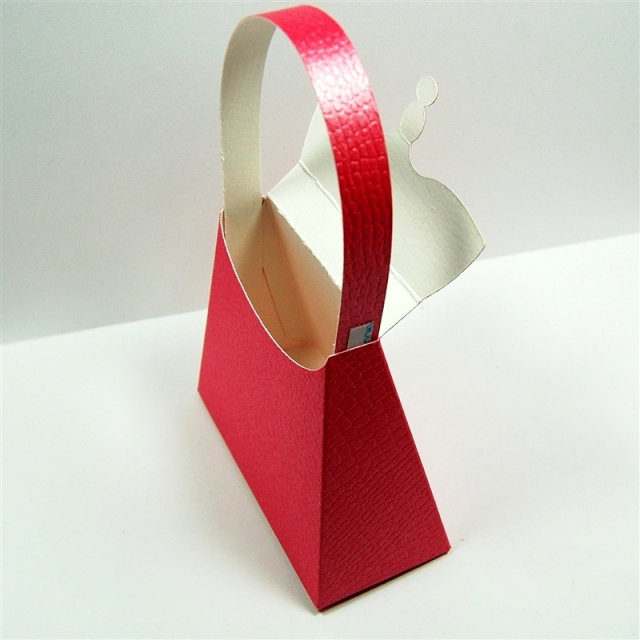
I also cut a strip of paper at 1/2 inch x 10 inches to use for a handle or strap. I added about an inch long piece of Scor-Tape and secured the handle inside the bag to get a strong hold.
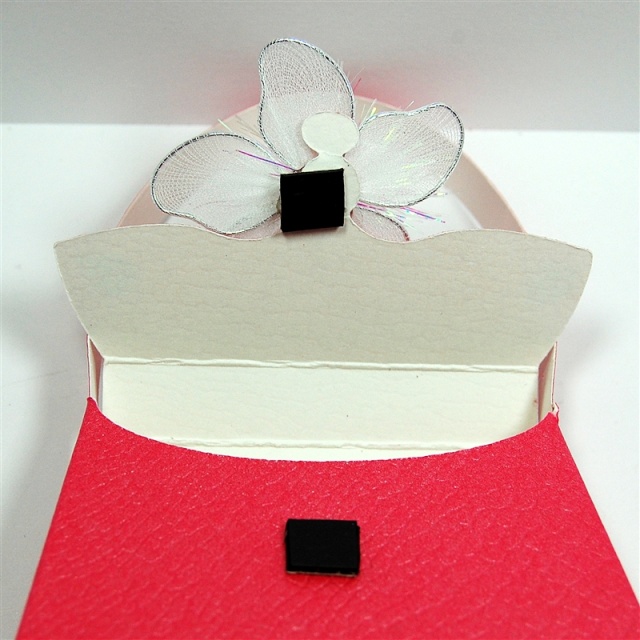
The cartridge design has tab and slit closure and these can wear out quickly. So I hid the line that would cut the slit and added some small magnet pieces to close the flap. These were cut from some leftover magnet frame material I had at home.
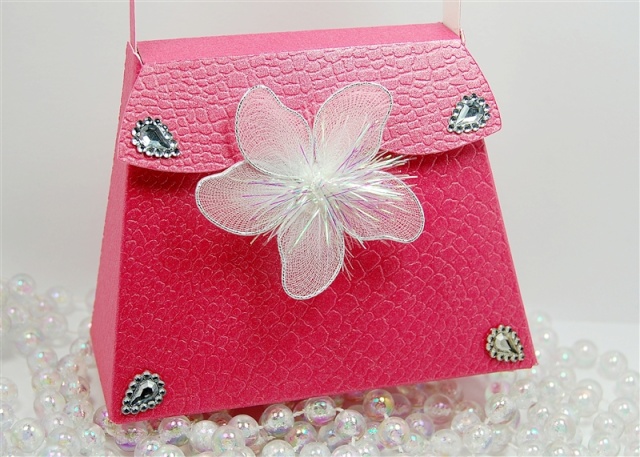
The decorations for the bag are these gems and a flared flower from Creative Charms. They give a nice sheen and sparkle to the bag.
I hope you picked up a few tips. There will be a post with more details and photos about this purse on my blog tomorrow - I had a Design Team project that had to post there today. My blog is called Capadia Designs . Please let me know if you have any questions and thanks again for inviting me to share a project and some tips with you. (I am sorry the photos are so large - I did try to shrink them a bit!)

I have been trying to use some of the cartridges that I purchased in the Black Friday sales last year, you know - the ones I "had to have" that have been sitting idly on the shelf. One of these was "Forever Young" which is an older cartridge I didn't get at first because it seemed too girly for my needs (I have only sons).
I thought today I'd share a few tips I have for cutting and putting together bags and boxes from your Cricut cartridges.

One of my pet peeves with the cartridges is the "tick marks" they cut to indicate the folds. For a regular card they are nonsensical - we all know how to fold a piece of paper in half! - and on the boxes and purses they make a very untidy edge that is not attractive. You can see the edges in the sample purse I cut from scrap paper above.

I don't like my pretty papers to be messed up with all of these extra lines. So I use Design Studio or the Gypsy to eliminate all of the interior cuts (known as webbing) with one simple step - just check weld. In the case of the purses on Forever Young you will also need to use "hide contour" to eliminate the word cut into the front. I can then use my sample cut with the marks to help me see where to score the purse to fold correctly. These score lines will be clean and neat with no cuts.

I was concerned that the bottom of the purse might not be sturdy enough for some heavy candy to be added so I cut an extra piece of cardstock to add as a reinforcement on the base. I use Scor-Tape or strong ATG adhesive to assemble bags and boxes.

I also cut a strip of paper at 1/2 inch x 10 inches to use for a handle or strap. I added about an inch long piece of Scor-Tape and secured the handle inside the bag to get a strong hold.

The cartridge design has tab and slit closure and these can wear out quickly. So I hid the line that would cut the slit and added some small magnet pieces to close the flap. These were cut from some leftover magnet frame material I had at home.

The decorations for the bag are these gems and a flared flower from Creative Charms. They give a nice sheen and sparkle to the bag.
I hope you picked up a few tips. There will be a post with more details and photos about this purse on my blog tomorrow - I had a Design Team project that had to post there today. My blog is called Capadia Designs . Please let me know if you have any questions and thanks again for inviting me to share a project and some tips with you. (I am sorry the photos are so large - I did try to shrink them a bit!)
Capadia- Posts : 2
Join date : 2011-03-27
 Re: March 28th - Tips on making a Purse or box
Hi Diane,
There are some fab tips there for us, I hate those little cut marks. I had to have a smile to myself as you told us they are called webbing - you might ask why . I have a son in army cadets and to him webbing is a piece of equipment they wear, it is a, for lack of a better description, a vest with loads of pockets on that they wear and have torches, water pottles, amo etc in! Then folks wonder why people have problems with the English language.
You mentioned you tick weld, would you have to go round highlighting the individual cuts and then tick weld on the Gypsy or Design Studio?
There are some fab tips there for us, I hate those little cut marks. I had to have a smile to myself as you told us they are called webbing - you might ask why
You mentioned you tick weld, would you have to go round highlighting the individual cuts and then tick weld on the Gypsy or Design Studio?
 Re: March 28th - Tips on making a Purse or box
Thanks Diane for the wonderful project & tips....love your purse! (and recognize the Creative Charms  )
)
 Re: March 28th - Tips on making a Purse or box
You don't have to individually hide the lines - ticking "weld" will eliminate them from the cut. This is why you lose the details on the faces when you make a shaped card with some of the cute animals. (There is a workaround for that which you can find on my blog).
The only thing you have to hide for this purse is the word that would cut of from the front - since that is a completed line it is not eliminated in the cutting. I also hid the slit for the tab closure so that when I reopen the file the word will stay hidden (in Design Studio if you hide only one line the line won't stay hidden when the file is closed and reopened).
I don't think that this will change in any updates but it would be a good idea to check on scrap paper first.
Capadia- Posts : 2
Join date : 2011-03-27
 Re: March 28th - Tips on making a Purse or box
Thanks for sharing your fab project and instructions. Love the faux leather card, so realistic.
 Re: March 28th - Tips on making a Purse or box
I must have ago at making this purse, thank you for sharing.
Pam- Posts : 239
Join date : 2011-01-02
Location : Lake District
 Re: March 28th - Tips on making a Purse or box
Beautiful purse! I love your tip about using a scrap piece to create a template for folding to avoid those tick marks! 
 Similar topics
» November 28th - Annette
» January 28th - Amy aka Aimitup
» May 28th Pop Up Card with Video
» July 28th guest designer!
» January 15th Sammy aka Cricutbutterflies
» January 28th - Amy aka Aimitup
» May 28th Pop Up Card with Video
» July 28th guest designer!
» January 15th Sammy aka Cricutbutterflies
Page 1 of 1
Permissions in this forum:
You cannot reply to topics in this forum

